


DIY Budget Egg Tumbler
4 posters
Rift Lake Cichlids :: Other :: DIY
Page 1 of 1

DIY Budget Egg Tumbler
![]() by why_spyder Mon Oct 17, 2011 2:09 am
by why_spyder Mon Oct 17, 2011 2:09 am
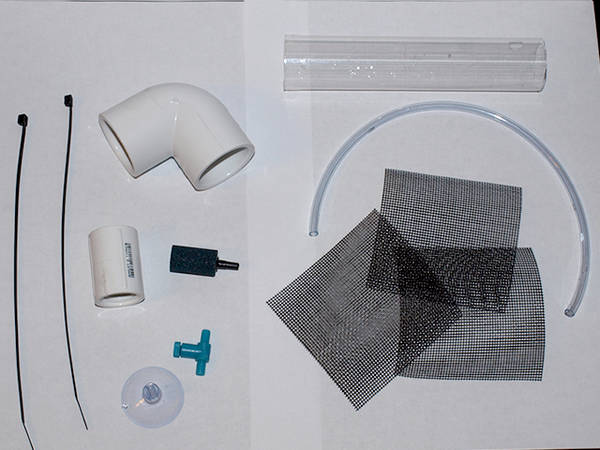
Here is the material list along with the prices for each item. I bought enough material to build at least 10 tumblers so some of the items were bought in bulk.
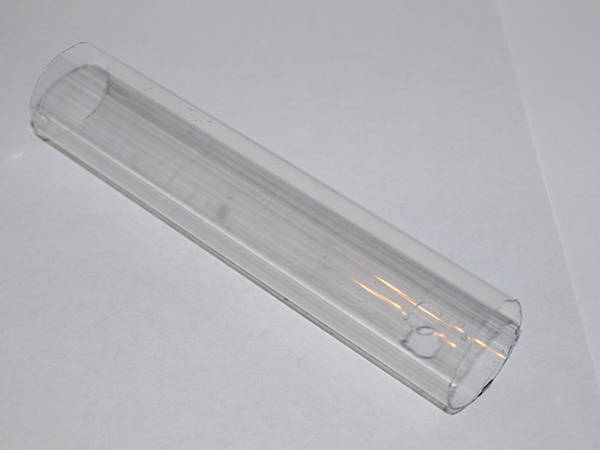
(2) Westinghouse Clear Polycarbonate 48" T-8 Lamp Guard : $2.56 ($0.16/item*)
(1) Origin Point Fiberglass Screening 36"X84" : $3.90 ($0.01/item**)
(1) 50' Clear Vinyl Airline Tubing : $3.50 ($0.07/item***)
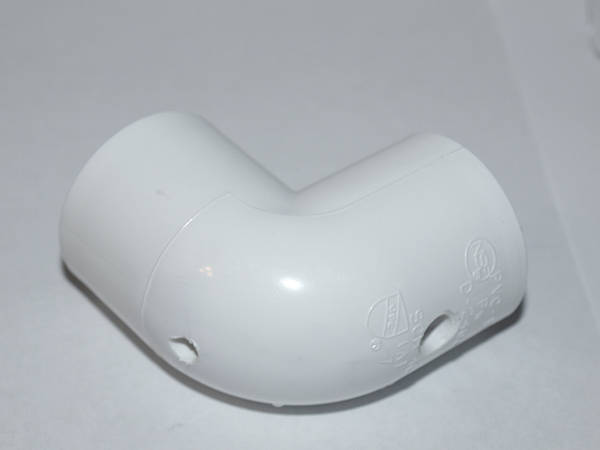
(1) 1" PVC 90 Degree Elbow (10 Pack): $2.99 ($0.29/item)
(2) 1 1/2" Clear Suction Cups (9 Pack) : $2.00 ($0.11/item)
(10) 1" PVC Threaded Coupling : $4.80 ($0.48/item)
(1) Black Zipties/Cable Ties (100 Pack) : $3.00 ($0.03/item)
(10) Lee's 2-Way Control Valve : $4.50 ($0.45/item)
(3) Hagen Elite 1" Air Stones (4 Pack) : $2.85 ($0.24/item)
* 48" tube cut into 6" sections.
** 36"X84" sheet cut into 3"X3" sections.
*** 50' tubing cut into 12" sections.
The price per tumbler is less than $2.00. My tumbler design is meant to be inexpensive, easy to build, and easily repaired. It's no fun trying to find specialty replacement parts.
The tools needed for making these are.
Utility Knife/Box Cutter
Scissors (optional)
Drill w/ bits
Here is the step-by-step for building the tumbler.
1. Cut one (1) 6" length of clear polycarbonate tubing per tumbler using the utility knife.
2. Cut three (3) 3"X3" squares of fiberglass screening per tumbler using the utility knife or scissors.
3. Cut one (1) 12" length of clear vinyl airline per tumbler using the utility knife or scissors.
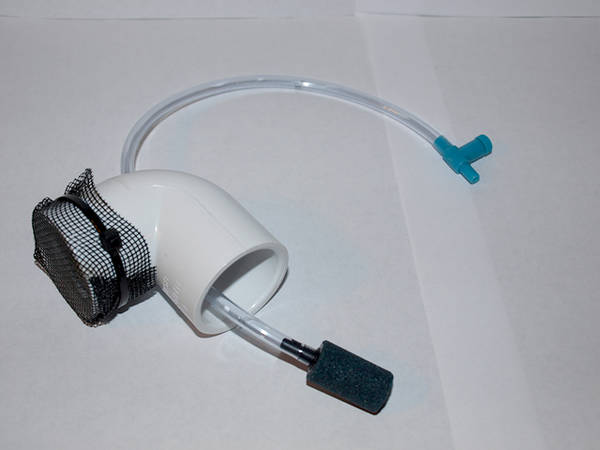
4. Place the clear polycarbonate into one end of the 1" 90 degree elbow until it fits snug. The tubing should not fall out on its own
5. Drill two (2) holes into the 1" elbow: one (1) hole on the outter straight (through the polycarbonate tubing too) for suction cup, and one (1) hole on the outter elbow for the airline. Be sure to drill the holes slightly smaller in diameter than the suction cup head and airline diameter. The suction cup head and airline are supposed to fit snuggly into the holes so that they stay in place.
6. Seperate the 1" elbow and polycarbonate tubing from each other. Set the polycarbonate tubing aside for now.
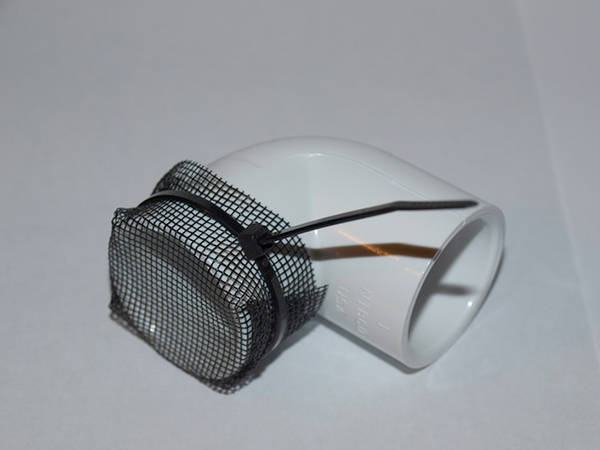
7. Place one (1) 3"X3" square of fiberglass screen over the end of the 1" elbow opposite of where you drilled the suction cup hole.
8. Ziptie the fiberglass screen into place. Carefully trim off any excess ziptie and fiberglass screen that is hanging off using the utility knife or scissors.
9. Feed the 12" clear vinyl airline through the airline hole in the 1" elbow. Place an airstone on the end inside the elbow, and a 2-way control valve on the opposite end outside of the elbow. Set the 1" elbow aside for now.
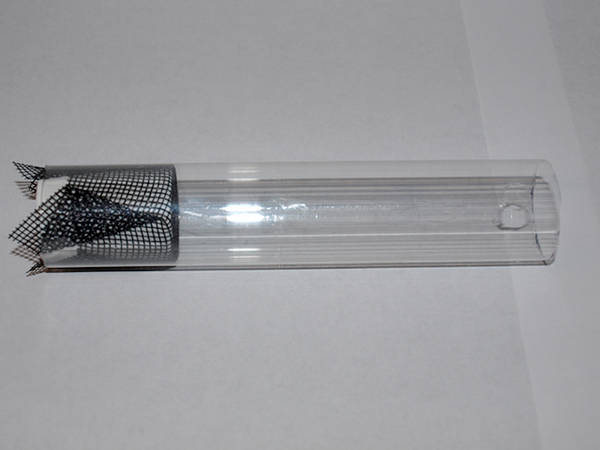
10. Place one (1) 3"X3" square of fiberglass screen over the end of the polycarbonate tubing, opposite of the end with the suction cup hole.
11. Place one (1) 1" coupling into the polycarbonate tubing, pushing the fiberglass screen into the tubing. Push the coupling and fiberglass screen in until the end of the coupling is flush with the end of the tubing. The coupling and screen should be snug in the tubing. Carefully trim off any fiberglass screen that is hanging out using the utility knife or scissors.
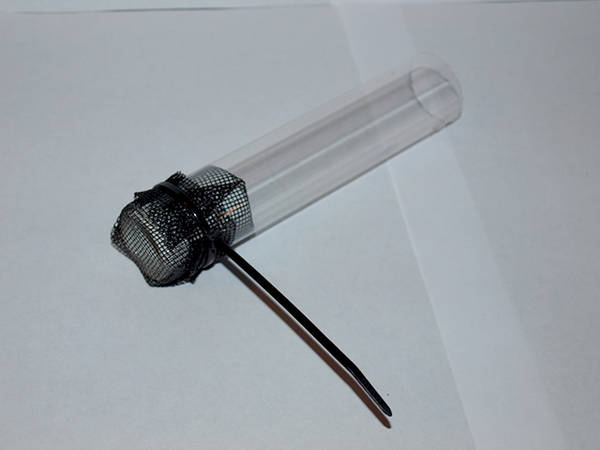
12. Place one (1) 3"X3" square of fiberglass screen over the end of the polycarbonate tubing, covering the 1" coupling.
13. Ziptie the fiberglass screen into place. Carefully trim off any excess ziptie and fiberglass screen that is hanging off using the utility knife or scissors.
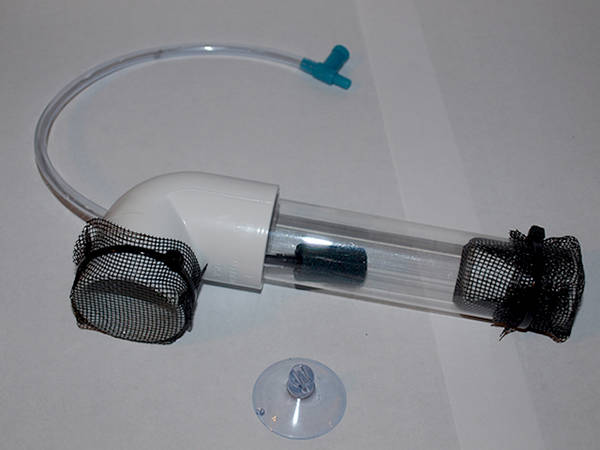
14. Place the polycarbonate tubing back into the 1" elbow, aligning the holes. Place one (1) suction cup into the hole.
15. Voilà, you're done!


(2) Westinghouse Clear Polycarbonate 48" T-8 Lamp Guard : $2.56 ($0.16/item*)
(1) Origin Point Fiberglass Screening 36"X84" : $3.90 ($0.01/item**)
(1) 50' Clear Vinyl Airline Tubing : $3.50 ($0.07/item***)
(1) 1" PVC 90 Degree Elbow (10 Pack): $2.99 ($0.29/item)
(2) 1 1/2" Clear Suction Cups (9 Pack) : $2.00 ($0.11/item)
(10) 1" PVC Threaded Coupling : $4.80 ($0.48/item)
(1) Black Zipties/Cable Ties (100 Pack) : $3.00 ($0.03/item)
(10) Lee's 2-Way Control Valve : $4.50 ($0.45/item)
(3) Hagen Elite 1" Air Stones (4 Pack) : $2.85 ($0.24/item)
* 48" tube cut into 6" sections.
** 36"X84" sheet cut into 3"X3" sections.
*** 50' tubing cut into 12" sections.
The price per tumbler is less than $2.00. My tumbler design is meant to be inexpensive, easy to build, and easily repaired. It's no fun trying to find specialty replacement parts.
The tools needed for making these are.
Utility Knife/Box Cutter
Scissors (optional)
Drill w/ bits
Here is the step-by-step for building the tumbler.
1. Cut one (1) 6" length of clear polycarbonate tubing per tumbler using the utility knife.
2. Cut three (3) 3"X3" squares of fiberglass screening per tumbler using the utility knife or scissors.
3. Cut one (1) 12" length of clear vinyl airline per tumbler using the utility knife or scissors.
4. Place the clear polycarbonate into one end of the 1" 90 degree elbow until it fits snug. The tubing should not fall out on its own
5. Drill two (2) holes into the 1" elbow: one (1) hole on the outter straight (through the polycarbonate tubing too) for suction cup, and one (1) hole on the outter elbow for the airline. Be sure to drill the holes slightly smaller in diameter than the suction cup head and airline diameter. The suction cup head and airline are supposed to fit snuggly into the holes so that they stay in place.
6. Seperate the 1" elbow and polycarbonate tubing from each other. Set the polycarbonate tubing aside for now.
7. Place one (1) 3"X3" square of fiberglass screen over the end of the 1" elbow opposite of where you drilled the suction cup hole.
8. Ziptie the fiberglass screen into place. Carefully trim off any excess ziptie and fiberglass screen that is hanging off using the utility knife or scissors.
9. Feed the 12" clear vinyl airline through the airline hole in the 1" elbow. Place an airstone on the end inside the elbow, and a 2-way control valve on the opposite end outside of the elbow. Set the 1" elbow aside for now.
10. Place one (1) 3"X3" square of fiberglass screen over the end of the polycarbonate tubing, opposite of the end with the suction cup hole.
11. Place one (1) 1" coupling into the polycarbonate tubing, pushing the fiberglass screen into the tubing. Push the coupling and fiberglass screen in until the end of the coupling is flush with the end of the tubing. The coupling and screen should be snug in the tubing. Carefully trim off any fiberglass screen that is hanging out using the utility knife or scissors.
12. Place one (1) 3"X3" square of fiberglass screen over the end of the polycarbonate tubing, covering the 1" coupling.
13. Ziptie the fiberglass screen into place. Carefully trim off any excess ziptie and fiberglass screen that is hanging off using the utility knife or scissors.
14. Place the polycarbonate tubing back into the 1" elbow, aligning the holes. Place one (1) suction cup into the hole.
15. Voilà, you're done!

why_spyder- Posts : 97
Join date : 2009-12-25
Age : 40
Location : Sparta, WI -

Re: DIY Budget Egg Tumbler
![]() by football mom Mon Oct 17, 2011 2:36 pm
by football mom Mon Oct 17, 2011 2:36 pm
Wow, Brian, the tumblers look awesome, but a lazy, un-handy person like me would
just rather send you some money and have you send me a couple! LOL
In all seriousness, I would buy some, I definitely can use them!
Jocelyn
just rather send you some money and have you send me a couple! LOL
In all seriousness, I would buy some, I definitely can use them!
Jocelyn
football mom- Posts : 975
Join date : 2009-07-08
Location : Portland, Texas
Re: DIY Budget Egg Tumbler
![]() by Aura Mon Oct 17, 2011 10:42 pm
by Aura Mon Oct 17, 2011 10:42 pm
Nice, neat job on the tumbler.
I've always tried to put a second screen between the bottom and the airstone -- to keep the eggs confined within the two layers of screen. Maybe I didn't need to do that! This looks like a much easier way to do it.
I've always tried to put a second screen between the bottom and the airstone -- to keep the eggs confined within the two layers of screen. Maybe I didn't need to do that! This looks like a much easier way to do it.
Aura- Admin
- Posts : 2580
Join date : 2009-08-14
Location : WA

theswede- Posts : 2120
Join date : 2009-11-18
Age : 55
Location : Timrå, Sweden
Re: DIY Budget Egg Tumbler
![]() by why_spyder Fri Oct 21, 2011 9:36 pm
by why_spyder Fri Oct 21, 2011 9:36 pm
I just had another "Hara" spawn, so I'll probably strip eggs this weekend and test 'em out - I have two running in our 125g.
why_spyder- Posts : 97
Join date : 2009-12-25
Age : 40
Location : Sparta, WI -
why_spyder- Posts : 97
Join date : 2009-12-25
Age : 40
Location : Sparta, WI -
Re: DIY Budget Egg Tumbler
![]() by football mom Sun Oct 23, 2011 8:38 am
by football mom Sun Oct 23, 2011 8:38 am
Keep us posted with the progress, looks great.
football mom- Posts : 975
Join date : 2009-07-08
Location : Portland, Texas
Aura- Admin
- Posts : 2580
Join date : 2009-08-14
Location : WA
Rift Lake Cichlids :: Other :: DIY
Page 1 of 1
Permissions in this forum:
You cannot reply to topics in this forum|
|
|