


350g tank build
Rift Lake Cichlids :: Other :: DIY
Page 2 of 6 •  1, 2, 3, 4, 5, 6
 ![]()
cichlidman- Competition Committee
- Posts : 968
Join date : 2009-11-26
Age : 73
Location : Winchester Tn.
Re: 350g tank build
![]() by iceblue Thu Jun 03, 2010 9:49 pm
by iceblue Thu Jun 03, 2010 9:49 pm
Aura. That piece on my workbench was a hope chest for one of my nieces. It's cedar lined with a couple of compartments inside. The front it of eventually got two hearts overlapping each other. My brother was very pleased with the way it came out and my niece thrilled when he gave it to her on her 18th birthday.
Klaus, I will soon have an empty 29g when I put the syno in the big tank. I was thinking of possibly a couple of Lamprologus to fill it in.

iceblue- Posts : 812
Join date : 2009-11-21
Age : 66
Location : Las Vegas, Nevada -

Re: 350g tank build
![]() by addicted2cichlid Thu Jun 03, 2010 11:39 pm
by addicted2cichlid Thu Jun 03, 2010 11:39 pm
addicted2cichlid- Posts : 442
Join date : 2009-07-25
Age : 39
Location : Naperville Illinois, USA
Re: 350g tank build
![]() by nitroloser Fri Jun 04, 2010 12:08 am
by nitroloser Fri Jun 04, 2010 12:08 am
nitroloser- Posts : 344
Join date : 2010-04-01
Age : 59
Location : wa
Re: 350g tank build
![]() by iceblue Fri Jun 04, 2010 12:00 pm
by iceblue Fri Jun 04, 2010 12:00 pm
addicted2cichlid wrote:norm, you gotta stop putting pics up of this thing, im drooling all over my laptop!
Better get yourself a towel. I'm just getting started.

Phase III. Paint.
Some of you may remember Lomax from C-F. He had built a couple of large plywood aquariums and was the inspiration to build mine. For one of them he had found a potable water safe roofing paint that was much cheaper than epoxy. I myself immediately ran out and bought 2 gallons of it. I had to call and drive around the entire Vegas Valley to find them and I'm pretty sure I got the last 2 gallons around. Unfortunately while the paint held water just fine it scratched easily and Lomax abandoned it. I could only find the receipt for one of the gallons I bought and ended up stuck with the other. After doing some more research on epoxy I ended up buying a gallon of light blue Sweetwaters 2 part potable water safe epoxy from Aquatic Eco-systems. This stuff is expensive and there is a hefty hazardous material shipping cost added to it.
Unfortunately (or so I was led to believe) it has a shelf life and by the time I got around to using it it had expired. I called Aquatic Eco-systems to see if it could still be used and of course they said no. So I ordered another 2 gallons since I had also added a plywood sump to the build. One in dark blue and the other light gray. I used 2 different colors so I could alternate between them to insure even coatings. The last of the paint was a gallon of exterior high gloss white to coat the inside of my hood.
As you can see the investment in paint was more then the two pumps to run my filters and almost as much as the wood.
3 gallons epoxy. $235.00
1 gallon roofing paint. $23.00
1 gallon high gloss white. $25.00
I ran out and bought several clear mixing container with graduated markings so I could mix the 2 part epoxy in proper proportions.
 This is a must. As expensive as the paint is you don't want to mix to much.....or not enough. After figuring out how much area I had to cover I divided that into the amount of coverage one gallon would give. The paint was applied with a small 4" roller for the flat surfaces and throw away brushes to brush in the corners. Between coats I put the brushes in sandwich baggies and into the freezer to keep them from hardening up. Once you start painting you cant stop. You only have 2 hours in which to re-coat otherwise you have to wait 48 hrs sand it out and re-coat. The tank has 7 coats and the sump has 5.
This was the first coat. Dark blue. It is so intense in density it made my eyes hurt to look at it too long.

The next coat was light gray. I liked the looks of this much better.

Half way through the painting I noticed I was getting these micro bubbles in the paint. I researched around and found out that I was not using enough paint on the roller. Instead of applying the paint it was pulling some of it off. So I stopped the project and waited 48 hrs to sand it out and begin applying again on a smooth surface. That's why the sump only has 5 coats. It will only be holding 10" of water and was not as critical as the tank that will be holding 32" of water.

Not wanting to waste paint I used the supposedly expired light blue epoxy to paint the rim of the sump. It worked just fine.


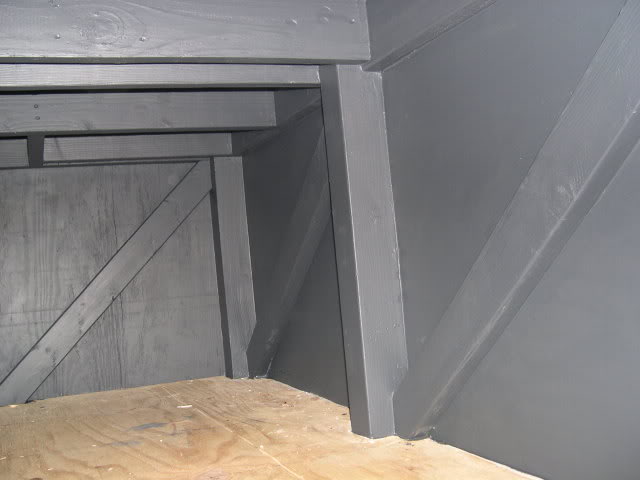
Before I had done most of the epoxy I used the roofing paint to coat the stand and the hood. It took 2 coats to completely cover but the second coat really made all the difference. It actually is pretty tough but I'll agree with Lomax that it can't be trusted as a coating for the inside of a tank.
First coat.

Second coat.
Finally I used the gloss white to paint the inside of the hood. It has 2 coats of KilZ white primer and 2 coats of the gloss white. Here just like the epoxy you don't want to wait to long to put a second coat of high gloss white on.

The top of the hood showing the roof paint and the light blue epoxy in the hydroponic trough.

One more pic of the sump. I left it the dark blue inside.

Last edited by iceblue on Sat Jun 05, 2010 4:02 pm; edited 2 times in total
iceblue- Posts : 812
Join date : 2009-11-21
Age : 66
Location : Las Vegas, Nevada -
Re: 350g tank build
![]() by iceblue Fri Jun 04, 2010 2:23 pm
by iceblue Fri Jun 04, 2010 2:23 pm


Last edited by iceblue on Fri Jun 04, 2010 10:42 pm; edited 1 time in total
iceblue- Posts : 812
Join date : 2009-11-21
Age : 66
Location : Las Vegas, Nevada -
Re: 350g tank build
![]() by theswede Fri Jun 04, 2010 10:04 pm
by theswede Fri Jun 04, 2010 10:04 pm

theswede- Posts : 2120
Join date : 2009-11-18
Age : 55
Location : Timrå, Sweden
Re: 350g tank build
![]() by iceblue Fri Jun 04, 2010 10:37 pm
by iceblue Fri Jun 04, 2010 10:37 pm
iceblue- Posts : 812
Join date : 2009-11-21
Age : 66
Location : Las Vegas, Nevada -

jimmymac- Posts : 196
Join date : 2009-06-29
Age : 64
Location : Arvada, Colorado USA
Re: 350g tank build
![]() by buntbarsch Sat Jun 05, 2010 10:50 am
by buntbarsch Sat Jun 05, 2010 10:50 am

I too used the gray epoxy and it worked out just fine. However, my plywood tank is not as elaborate as yours and I will steal some of your ideas for my next one.


buntbarsch- Competition Committee
- Posts : 680
Join date : 2009-11-20
Age : 75
Location : Toronto, Canada -
Re: 350g tank build
![]() by Rift_Lakes_Rule Sat Jun 05, 2010 11:04 am
by Rift_Lakes_Rule Sat Jun 05, 2010 11:04 am

Rift_Lakes_Rule- Admin
- Posts : 1752
Join date : 2009-06-27
Age : 50
Location : West Virginia 25427
Re: 350g tank build
![]() by bulldogg7 Sat Jun 05, 2010 11:19 am
by bulldogg7 Sat Jun 05, 2010 11:19 am
And take some pics

bulldogg7- Admin
- Posts : 2486
Join date : 2009-07-11
Location : Henderson co., NC
Re: 350g tank build
![]() by iceblue Sat Jun 05, 2010 11:54 am
by iceblue Sat Jun 05, 2010 11:54 am
Phase IV. Filters and plumbing,
While dumping trash from a kitchen remodel at my previous employer's shop I came across another vendor cleaning out his place of business. He was throwing away a lot of sheet plastic and I grabbed a bunch of it. It took a while of calling around but I finally found a vendor that sold the glue I needed. Even though it was expensive they were the only ones in town that could sell it. Some of you may of heard of them. Acrylic Tank Manufacturing. They have done some very impressive work for some very high dollar people.
My first build was a couple of simple overflow boxes. They made for good practice as I had never done anything like this before. One thing to note is if you have any holes or slots to put in a project like this do them ahead of time before gluing all the pieces together.

My next build was the bio-filter. It should have been another simple box but I decided to try a few things I hadn't seen done before. The first thing that is a little different is I slotted the side walls of the box to get better airflow to the media. This just made sense to me as the one of the main ingredients for good, healthy growth of bacteria is oxygen. Whether this will help or not I can't say but I know it couldn't hurt.
This is how it looked for quite a while and I was happy with it. Still pretty much just a box.

I placed an angled band around the middle of the slotted sides to add strength and redirect any water that may trickle out the top half of the filter which sits outside the sump.

Just before falling asleep one night I was thinking of how I could create an air stop for the bottom end of the drain lines of the modified Durso set-up I was going to use and it hit me. I even got out of bed and went downstairs to the garage to look at the bio-filter and work out the details.
I cut the height of the box and built a channel around the outside so my pipework would be lower than the top inside lip of the filter itself. That gave me a water seal for the Durso and also gave me the added benefit of no splashing noises commonly associated with wet/dry filters that dump down from the top. The water comes in and up then over the inside lip making a very smooth transition. No splashing.

Inside view of the filter showing the frame support for the eggcrate bottom.

The eggcrate for the bottom and the drip plate for the filter. The drip plate has dozens of 1/8" countersunk holes. I purposely drilled to many of them for the flow it will get so I could put ping pong balls on top that will move around and plug holes until the water level changes and they rise up to move to another location and there by help prevent channeling through the filter.

A couple of overview pictures.


I also built 2 mechanical filters to sit on either side of the tank. I separated them from the bio-filter for a couple of reasons. 1: So I don't have to bend over and go through twisted histrionics to change the filter material and 2: To redo the filter sometime down the line. I have a few ideas on how to better handle solid wastes that eventually break down and and foul the water. It seems to me there could be more done about this but has largely been ignored in the hobby.
This is the mech. filter box. It was a little more complicated to build than the other projects because of all the internal pieces. When welding a project like this planning ahead is a must. You don't want to have to take it apart to glue something in that you forgot about.

These are the filter pads that are sandwiched between eggcrates (gotta love eggcrate) and placed inside the frames shown. This assembly then slides into slots inside the filter box. The tolerances here had to be carefully worked out. You don't want it so tight that you have difficulty sliding them in and out but you also don't want it so loose the water gets by the edges.

A picture of it fully assembled.

That's all for now. Just about everybody is up and I can get started on getting my glass glued in.
iceblue- Posts : 812
Join date : 2009-11-21
Age : 66
Location : Las Vegas, Nevada -
Re: 350g tank build
![]() by iceblue Sat Jun 05, 2010 7:13 pm
by iceblue Sat Jun 05, 2010 7:13 pm

And the after shot. Even though I used 3 1/2 tubes of silicone you can't smell a thing in the house according to my wife. I myself can't smell anything right now after being inside that "tent" with the raw silicone for 25 minutes.

The glass is in place with three 5 gallon buckets holding it down.I didn't get any pictures of the gluing process because my son and I wanted out of there as quickly as possible. There really isn't much to see and I'll take a pic after the silicone dries.
iceblue- Posts : 812
Join date : 2009-11-21
Age : 66
Location : Las Vegas, Nevada -
Re: 350g tank build
![]() by Rift_Lakes_Rule Sat Jun 05, 2010 7:53 pm
by Rift_Lakes_Rule Sat Jun 05, 2010 7:53 pm
YOU'RE A FREAKIN GENIUS!!!
Rift_Lakes_Rule- Admin
- Posts : 1752
Join date : 2009-06-27
Age : 50
Location : West Virginia 25427
Re: 350g tank build
![]() by theswede Sat Jun 05, 2010 9:25 pm
by theswede Sat Jun 05, 2010 9:25 pm

theswede- Posts : 2120
Join date : 2009-11-18
Age : 55
Location : Timrå, Sweden

buntbarsch- Competition Committee
- Posts : 680
Join date : 2009-11-20
Age : 75
Location : Toronto, Canada -
Re: 350g tank build
![]() by iceblue Sun Jun 06, 2010 12:43 pm
by iceblue Sun Jun 06, 2010 12:43 pm
Another thing I did a lot of research on and actually put in a little thought was the pipe-work. The running costs of a large tank can add up quickly so I worked hard to find ways to reduce it. I'll be using 2 Sen 900 submersible pumps to feed my filters. They run at 90 watts each but give you 900g of flow at 3' of head. Using a sump system allows you to also reduce the filter turnover rate. There are several things you can do to reduce head pressure and maximize flow to get more bang out of your pumps.
1: Reduce the number of bends in your line. Each hard 90 degree fitting adds 1 foot of head pressure.
2: Using long gradual 90 degree turns can reduce back pressure by half. Some refer to this as a sweep 90.
3: Up the size of your piping. If your pump has a 3/4" outlet use a reducer at the pump discharge to up it to a 1" line. This greatly reduces sidewall friction and allows faster (more volume) of flow.
4: Eliminate hard edges inside your pipes. Some of you motor-heads will appreciate this. Much like massaging the intake and exhaust ports on your heads to match your gaskets and increase air flow (horsepower) I used a Dremel with a barrel sander to massage the inside of my pipes to match the fittings. I left just enough of a lip on the pipe to match the landings inside the fittings. All the water flow in within the pipework will hit no hard edges.
Here's a pick of all the pipework not including the under-gravel jet system.

In this pic you can see the return line from the tank to the mechanical filter. From the mech. filter the water exits through the pipe to it's right in front of the filter pads and goes down into the stand where it exits into the bio-filter. Both overflow lines have a 1/2" gate valve to control air flow and noise. They are kind of Durso set-up that I'll probably have to tweak once the tank is up and running. The pipe to the right and outside the filter is a redundant spillway to the sump on case the filter clogs. The 1" line that goes from the stand and over the top of the tank is the discharge from the filter pumps. Since this pic was taken I came up with the idea of putting a small gate valve in the top of the gray sweep 90 and using it to both add water to my hydroponic trough in the hood and to act as a siphon break when the pumps get turned off.

I also made an under-gravel jet system. There are two lines each fed by their own pump. I'm using Capp 2200 submersible pumps to run them.

As you can see I'm getting a lot of good action out of them.

That's all for now. I've got to go do yard-work.
Last edited by iceblue on Sun Jun 06, 2010 3:34 pm; edited 1 time in total (Reason for editing : My pumps were capp 2200 not 800.)
iceblue- Posts : 812
Join date : 2009-11-21
Age : 66
Location : Las Vegas, Nevada -
Re: 350g tank build
![]() by iceblue Mon Jun 07, 2010 3:22 pm
by iceblue Mon Jun 07, 2010 3:22 pm
So I was pretty much on my own so I went out on a limb and began experimenting with different mixtures of Portland II cement, a little sand and a lot of perlite as the aggregate. I came up with a mixture I liked that was easy to work with and is just slightly less buoyant than water. After each structure was done I did a 1/4" skin coat over them with a grout mixture of my own making.
Phase V: I started with perimeter sections that included the under-gravel jet system built into it. For this part of the project I also mixed shredded fiberglass screening into the mix to prevent shrinkage around the pipe work.

A dried section with the pipework removed.

A section showing the packing foam that separates all the sections in this project from the tank and adjoining pieces.

This pic shows a completed section and new sections going up around it. The concrete mix allowed me to put a lot of caves in the structures. The beer bottle will give you a good idea of the scope of this project.

Close up of a new section being started.

More sections done.

Background about half done. The 3 different gray colors show the order in which they were built The lighter the older.

With the moon lighting system on.

I built false front sections to hide the return water lines from the sump and the pumps that run the under-gravel jet system.

Picture showing the progression of the false-front build. Eggcrate is the DIYrs dream material.


The final stage was the center sections that kind of divide the tank into thirds.


Finally I painted the whole thing with a mixture of thinset, Sika acrylic fortifier and several different liquid concrete color mixed in varying proportions to achieve the desired colors.
First overall coat was dark charcoal gray.

White stripes.

Base colors.

More darker dots of color.

Even more dots of dark color.

Finally I made a slurry to darken it further using a glazing technique.

Closeup of the final product. It has been sprayed with water to see how it would look when the aquarium gets filled.

If you would like to see a more detailed post of this project you can go to http://www.cichlid-forum.com/phpBB/viewtopic.php?t=156511&start=0
iceblue- Posts : 812
Join date : 2009-11-21
Age : 66
Location : Las Vegas, Nevada -
Rift_Lakes_Rule- Admin
- Posts : 1752
Join date : 2009-06-27
Age : 50
Location : West Virginia 25427
Re: 350g tank build
![]() by buntbarsch Mon Jun 07, 2010 9:09 pm
by buntbarsch Mon Jun 07, 2010 9:09 pm
buntbarsch- Competition Committee
- Posts : 680
Join date : 2009-11-20
Age : 75
Location : Toronto, Canada -
Re: 350g tank build
![]() by iceblue Mon Jun 07, 2010 10:42 pm
by iceblue Mon Jun 07, 2010 10:42 pm
buntbarsch wrote:Amazing................and all this for Malawi cichlids
Nothing but the best for my baby's Klaus. 
iceblue- Posts : 812
Join date : 2009-11-21
Age : 66
Location : Las Vegas, Nevada -
Aura- Admin
- Posts : 2580
Join date : 2009-08-14
Location : WA
nitroloser- Posts : 344
Join date : 2010-04-01
Age : 59
Location : wa
Re: 350g tank build
![]() by theswede Tue Jun 08, 2010 9:12 am
by theswede Tue Jun 08, 2010 9:12 am
theswede- Posts : 2120
Join date : 2009-11-18
Age : 55
Location : Timrå, Sweden
Page 2 of 6 • 1, 2, 3, 4, 5, 6 ![]()
» so i finaly get to build one
» 125gal and 45gal stand build (day 1)
» Building your own tank
» Wow. now this is a tank!
Rift Lake Cichlids :: Other :: DIY
|
|
|